Last Meeting before the Real Shoot
We met one last time today before our real shoot which is tomorrow, and i feel much more ready for it now. This week has been quite productive as we edited our test shots together and learnt a lot about which shots look good and which onbes don't look good. I also got some useful practice with the editing programme which i found very helpful.
Over the week we had to rethink part of the sequence because we had some continuity problems but we finally overcame this today in our last meeting. We finalised a lot of things such as the story board and shooting script. We also finally found the perfect date (Barney) for Laura (the female actress) after a lot of looking around!!
We took a picture of the couple this lunchtime and we all think they are the perfect cast for our film. We are going to be meeting around 12pm tomorrow to go over things, set up the mis-en-scene and get a bit of extra practice with the camera (e.g. to make our pans smoother etc.)
Things i need to remember- a photoframe and red nailvarnish.
I am really looking forward to tomorrow, especially as we have such lovely and co-operative actors to work with =)
Friday, November 28, 2008
Tuesday, November 25, 2008
My Reflections on the Test Shoot
I found that the test shoot was extremely fun but also very helpful as before, everything looked fine on paper but I wasn’t so confident that the practical would work out as we wanted. As planned, we did our test shoot yesterday (24th November) from 12pm to 8 pm which at first we thought would be much too long, however as we learnt, things take a lot longer than you think. I found that the test shoot was a great success as we learnt a lot from it as it enabled us to visualise the real opening sequence better, seeing in practical terms, what works and what does not work.
We spent around the first 2 hours planning our shots in more detail and I drew up a final storyboard for the test shoot whilst Alice and Mel began to set up the equipment and mis-en-scene, an efficient way of working. We then came up with a shooting script, which we found was very helpful as we did all the outside shots first, then the staircase shots followed by all the kitchen shots, and finally the bedroom and bathroom shots, which seemed like a practical way of doing things. We also decided to go out again to test our street shots in a different light so we can compare and contrast seeing which is better for the final shoot. This was one of the very helpful aspects of the test shoot as we got to experiment with different lighting, angles shots etc and means that after choosing what we like, we will not waste too much time on the actual shooting day.
Things that went well:
-Some nice experimental shots inspiring us to use more interesting ones than the shots we had planned (for example the spooky track and tilts of the guy walking from different angles)
- Mis-en-scene looked really good especially in the kitchen
-nice use of red props
- Mel’s lovely make-up looked good but at the same time scary
-Alice’s House is perfect for film- just as I had imagined it!
- We all really enjoyed ourselves and stayed motivated throughout the day with some Maryland cookies, hot chocolate, coke, hoola hoops and chocolate fingers to keep us going =)
Things I learnt from it:
- An extremely detailed storyboard is essential (especially for parts with continuity)
- Shooting script is very useful
- Practice is need to make my pans smoother
-Filming must be done between 4-5pm because after it gets too dark and the street shots particularly are difficult to see.
- We should plan our time better so we don’t rush towards the end
- Dress up warm for the day of the shoot!!
Monday, November 24, 2008
BLK feedback
Aarti, some great work here but your labels need some development and you need to link your continuity sequence urgently please
Thursday, November 20, 2008
Coursework Begins…
Here is a summary of our first four meetings and my own reflections.
The First Meeting
I had my first meeting with Alice and Mel and it was great as I felt very comfortable in a group with them and we all get on very well together. Each of us had come up w ith an initial idea and we discussed the practicalities and impracticalities of each finally coming to a conclusion. We decided to use Alice’s idea and developed it as a group. We were all very excited and enthusiastic about filming it and came up with lots and lots of ideas. We also brainstormed actors and locations. Alice and Mel decided to take pictures of their houses which seemed appropriate for our film.


Here is a summary of our first four meetings and my own reflections.
The First Meeting
I had my first meeting with Alice and Mel and it was great as I felt very comfortable in a group with them and we all get on very well together. Each of us had come up w
 ith an initial idea and we discussed the practicalities and impracticalities of each finally coming to a conclusion. We decided to use Alice’s idea and developed it as a group. We were all very excited and enthusiastic about filming it and came up with lots and lots of ideas. We also brainstormed actors and locations. Alice and Mel decided to take pictures of their houses which seemed appropriate for our film.
I didn’t think my house would be appropriate as it is quite bright and colourful, and the kitchen is quite modern. It doesn’t have the right feel to it>>


Our aims for the next meeting:
-start looking for actors and asking who is available
-location pictures
The Second Meeting
We looked at the location photos, and decided to use Alice’s house as its layout, colours, lighting and furniture all seemed perfect for our film. Mel’s house had too much open space which made it seem less scary. We also had two actors in mind for both the role, Matthew Anastasis for the male role, and Laura Christophis for the female’s role and all agreed that the two would be perfect. We then planned out the whole initial sequence in bullet points. This meeting was very productive!
Our aims for the next meeting:
-Each of us has to storyboard 8-10 shots from our initial opening sequence.
The Third Meeting
We all brought our storyboard sheets in and this was really useful as we can now visualise the sequence better. We also got some useful feedback from Miss Blackborow which means we have to change our initial idea a bit but this should not be a problem as it just means we need to have less cut-always and give the audience time to identify with the female character before introducing a new character straightaway. This makes sense! We also came up with more ideas for the cast as the actors we had in mind originally, may have commitment problems. We thought before the test-shoot (which is less than a week away) we should look at actual opening sequences to get some ideas and get used to the way they edit and use continuity and the mis-en-scene.
Our aims for the next meeting:
-Each of us should analyse an inspiring opening sequence and see what we can learn from it that would be helpful to us when filming our sequence. I’m going to analyse Legally Blonde!
The Fourth Meeting
We finally decided on dates and times for our test shoot which is a relief as we were all busy on different days. It seems like its going to be quite a challenge and we are slightly worried after thinking through the issues we might face, however we are going to give it are best and see what happens. We should be finalising shooting scripts, storyboards etc. on Friday, and with the equipment release, we will be ready to go!
Our aims for the next meeting
-try and find a big torch!!
- Work out an appropriate continuity order for the first 5-6 shots
Monday, November 17, 2008
My Initial Idea
My idea is about a man who has had a very scarring childhood. He is full of so much hatred and revenge that he takes it out other children. In the film, he disguises himself as a teacher in order to carry out the murder of different children.
This would class has a horror film due to its themes of revenge, murder and disguise. It would also consist of gore and violence.
It would be easy to film as it is set in and around the school.
The Opening Sequence
The opening sequence could consist of a teacher in his office with his mark book. Everything seems extremely normal. He has a short conversation with another teacher who then leaves the room. We then get a view of his mark book inside which there are pictures of children, some of which have been crossed out. We see flash backs from his childhood (a boy being bullied for example). He then crosses out another child in his mark book, picks up a knife, and leaves the room. I think this would be quite a unique storyline with a great twist.
It may be slightly complicated as we would need to film after school and so we might not have enough time. It may also be hard to find an actor for the teacher role, but we could consider this idea.
Wednesday, November 5, 2008
My Horror Characters Mood board
Here are some conventional character types used in horror films:
- Alice Hardy from Friday the 13th- the Sole survivor however she is stabbed in part 2.
- Marion Crane from Psycho- typical pretty Female victim
- Count Dracula from Dracula- the villain- Dracula returns from his death as a Vampire
- Annie Brackett from Halloween- the female victim’s best friend
- Sheriff Leigh Brackett from Halloween – the Haddonfield Sheriff as well as father of female victim in Halloween 2.
- Alexandra Marie Coyle from A Nightmare on Elms Street- teenage female victim.
- Amanda Young from Saw- victim and heroin addict
- Mark Hoffman from Saw- detective working at the Crime scene
- Lieutenant Daniel Rigg from Saw- SWAT officer
- Lawrence Gordon from Saw- the doctor
- Ghostface from Scream- the Serial Killer
- Norman Bates from Psycho- insane man with dissociative identity disorder
- Dr Malcolm Crowe from The Sixth Sense - child psychiatrist
Tuesday, November 4, 2008
Marketing through Websites
I thought it would be a good idea to research horror movie website to see how it markets the film with its own unique promotional style. In the last few years especially websites have increasingly become part of the marketing mix for filming companies. One reason for thi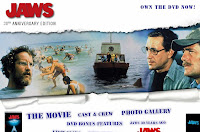 s is that the cost for this is extremely low compared to other forms of advertisements. Another reason is the growing number of internet users and so it’s an easy medium through which to target your audience. It is also useful as when mass media advertisements have stopped, websites continue to promote the film and create general awareness.
Take Jaws for example, a website that was very effective at catching my eye due its use of recognisable and iconic images.
This is the first page that appears which I thought was extremely clever as it is already advertising the film, immediately taking the opportunity to sell the DVD. By placing you advertisements first, means that a viewer who wishes to enter the si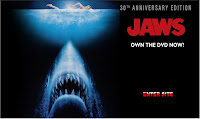 te is bound to see the advert.
It is simple to and to the point with minimum text! Most the page is taken up by the famous iconic image of the vicious shark looking up at the female victim who is swimming. The word Jaws is in big and red to catch the audiences attention also connoting the dangerous elements of the movie. It is also interesting how the ‘Enter Site’ button is blood stained as if a warning of death and distress. Evidently, it is a good idea to incorporate your generic theme in the different aspects of the website like as done with this button. The genre of horror is clear from the colour scheme of black connoting suspense and mystery and the red connoting danger. The image of the shark also represent the horror genre as it is looks extremely terrifying and threatening. The blue tint also gives the image a very mysterious look but at the same time connotes the seawater.
There is then a shot montage of still shots from the movie before the viewer enters the site itself. This is very effective in giving the viewer an insight into the movie. The montage gets faster and faster and although we are not watching a moving image the tension still builds up as they have used dialogue from the movie as well as the famous Jaws music itself in the background. Being a blockbuster movie it already has an audience however, this is effective in jogging their memory highlighting the best bits of the movie. I thought this was another very good idea, so instead of just having an interactive and informative website, the music playing in the background also creates the right atmosphere getting the viewer in the mood to watch the film itself. (Well that’s the effect it had on me!)
Even the loading sign is rising level of blood in the ocean, which is quite disturbing. This shows how marketing teams can do all sort of interesting things when applying their theme to the website. The repetition of iconic images emphasises them making them memorable for the audience and more recognisable in the future.
The screen is then ripped through by a shark’ tail , another graphically effective idea. Websites therefore give you a chance to be very imaginative so you can use unique ways of impressing the audience.
The website itself is extremely informative. It consists of:
-Background film information:
-Cast and Crew
-Photo Gallery
-Video Clips
-‘Jaws 30 years ago’
-DVD bonus features
This gives an idea of some of the main elements to include in a film website. They also advertise:
-Their game, Jaws unleashed
-An exclusive limited edition 60-page commemorative journal
-Jaws 30th anniversary DVD
- ‘The Shark is Still Working’ documentary

Another good website to take a look at is the Men In Black one which also advertises its DVD, video game, fan magazine as well as its spin-off animated series and continues to gain the movie some publicity.
To summarise…the main functions of a film website are to:
1) Provide information about the film itself
2) Create themes, effects and content that all enhances the experience of the film
3) Allow consumers to purchase products online
I thought it would be a good idea to research horror movie website to see how it markets the film with its own unique promotional style. In the last few years especially websites have increasingly become part of the marketing mix for filming companies. One reason for thi
 s is that the cost for this is extremely low compared to other forms of advertisements. Another reason is the growing number of internet users and so it’s an easy medium through which to target your audience. It is also useful as when mass media advertisements have stopped, websites continue to promote the film and create general awareness.
Take Jaws for example, a website that was very effective at catching my eye due its use of recognisable and iconic images.
This is the first page that appears which I thought was extremely clever as it is already advertising the film, immediately taking the opportunity to sell the DVD. By placing you advertisements first, means that a viewer who wishes to enter the si
 te is bound to see the advert.
It is simple to and to the point with minimum text! Most the page is taken up by the famous iconic image of the vicious shark looking up at the female victim who is swimming. The word Jaws is in big and red to catch the audiences attention also connoting the dangerous elements of the movie. It is also interesting how the ‘Enter Site’ button is blood stained as if a warning of death and distress. Evidently, it is a good idea to incorporate your generic theme in the different aspects of the website like as done with this button. The genre of horror is clear from the colour scheme of black connoting suspense and mystery and the red connoting danger. The image of the shark also represent the horror genre as it is looks extremely terrifying and threatening. The blue tint also gives the image a very mysterious look but at the same time connotes the seawater.

There is then a shot montage of still shots from the movie before the viewer enters the site itself. This is very effective in giving the viewer an insight into the movie. The montage gets faster and faster and although we are not watching a moving image the tension still builds up as they have used dialogue from the movie as well as the famous Jaws music itself in the background. Being a blockbuster movie it already has an audience however, this is effective in jogging their memory highlighting the best bits of the movie. I thought this was another very good idea, so instead of just having an interactive and informative website, the music playing in the background also creates the right atmosphere getting the
 viewer in the mood to watch the film itself. (Well that’s the effect it had on me!)
Even the loading sign is rising level of blood in the ocean, which is quite disturbing. This shows how marketing teams can do all sort of interesting things when applying their theme to the website. The repetition of iconic images emphasises them making them memorable for the audience and more recognisable in the future.
The screen is then ripped through by a shark’ tail , another graphically effective idea. Websites therefore give you a chance to be very imaginative so you can use unique ways of impressing the audience.

The website itself is extremely informative. It consists of:
-Background film information:
-Cast and Crew
-Photo Gallery
-Video Clips
-‘Jaws 30 years ago’
-DVD bonus features
This gives an idea of some of the main elements to include in a film website. They also advertise:
-Their game, Jaws unleashed
-An exclusive limited edition 60-page commemorative journal
-Jaws 30th anniversary DVD
- ‘The Shark is Still Working’ documentary

Another good website to take a look at is the Men In Black one which also advertises its DVD, video game, fan magazine as well as its spin-off animated series and continues to gain the movie some publicity.
To summarise…the main functions of a film website are to:
1) Provide information about the film itself
2) Create themes, effects and content that all enhances the experience of the film
3) Allow consumers to purchase products online
Monday, November 3, 2008
Preliminary Task
Our preliminary task was to film a continuity sequence consisting of a character opening a door, crossing a room and sitting opposite another character with whom he or she has a short conversation.
1) Who did you work with and how did you manage the task between you?
I worked on this task with Tanya, Nick and Simon so there was a balance of girls and boys, and we all worked very well together. As soon as we got into our group, we immediately began to brainstorm ideas for possible scenarios we can film considering the limited time and space we had. We all contributed to this, finally narrowing our ideas down to a conversation between a teacher and student, or two school friends. After all agreeing on our final idea of a conversation between two friends, we decided on the setting, which was the Media block itself for convenience. We then decided on who was going to undertake which task on the day of the shooting. Tanya and I were willing to split the roles of the Director, Production Assistant and Sound Technician between us, whilst Nick and Simon agreed to be the actors.
As a group, we thought of ideas for a short and simple script, which Nick and Simon then wrote up, and we planned our shots. With about 16 shots to begin with, we each did one page of the storyboard. We had to plan an extra meeting during our free periods to finish things off completely so that we were all ready for the shooting day.
On the day although we had our set roles, we swapped for some shots so that Tanya, Simon and I all got a chance at filming, whilst Nick was in mostly all the shots. This worked very well as we all got a little but useful taste of the different roles within the filming industry and how they each work.
2) How did you plan your sequence? What process did you use?
After deciding on a scenario, we planned our sequence by deciding on our shots and placing them in chronological order. We made sure our shots were simple, using mainly an LS for the master shot and MS/MCU for the rest of the shots with one CU. We also had to make sure that there were no continuity breaks and that all the shots made sense. We then transferred this information onto a storyboard drawing four shots each and filling out the appropriate detail (Shot no., Shot type, time, edit etc.).
In order to be efficient as well as for the director’s convenience, we re-arranged our shots into a shooting script, which presented the shots in the order that we were going to shoot them. We decided to film all our classroom shots first as the corridor was going to be used by the other group first. We also did a brief walk through what we were going to do on the day of production.
3) What technology did you use to complete the task, and how did you use it?
We used cannon HV30 camcorder and a tripod to film the sequence. We also used a handheld microphone and headphones for the sound check. It was the director’s job to carry out the following process before they began to film:
-Camera ready?
-Sound ready?
-Camera Rolling!
[Clapperboard held for 5 secs]
-Action!
[Hold for a few extra seconds at the end of scene- this is essential when it comes to editing the clip]
-Cut!
This was a useful process to check that all the equipment was ready and that everyone knew what they were meant to be doing and when.
4) What factors did you have to take into account when planning, shooting and editing?
-When planning our shots we had to consider the continuity techniques that we were going to use such as match on action so that our shot types made sense in that particular order.
- We also had to consider the number of shots we were planning to use to make is as simple as possible and we also decided to use as little camera movement as possible.
-We had to consider the weather: whether we should shoot coming from outdoors or just indoors
- Another factor we had to take into account to do with the setting was planning from which door the actor would walk in, and where they would sit making sure we did not break the 180◦ rule. For this we did a walk through.
-When shooting we had to consider the limited time we had and therefore act efficiently following the shooting script.
- We also had limited members of the group so we split the roles of actors, director, production assistant and sound technician between us, swapping if necessary.
-Other groups were using the same set as us, and so this was another factor to consider. We decided to film in the classroom first while they used the corridor, and then swap over.
- The noise level of the media block was also taken into account as other people are always working there. However, this was not so much of a problem as everyone was quite co-operative.
-When editing we had to consider the continuity techniques whilst cutting our shots for example so the match on actions follow on smoothly.
- We also had to consider which ones we were going to reuse for example the master shot so that we could cut it instead of trim it, and the ones which we only need once which we could trim.
5) How successful was your sequence? Please identify what worked well, and with hindsight, what would you improve/do differently?
I thought that overall, our sequence was quite successful, as it looked realistic with no major breaks in the continuity. We managed to stick to the brief using a range of continuity techniques. I think our match on action from MCU to CU of the hand pushing door handle worked quite well. I also think the shot reverse shot is successful in presenting the conventional conversation scene with an interesting OTS of Nick reading the comic in between. We also stuck to the 180◦ rule. There is however a slight continuity error when Nick turns the page which we could have improved with a better match on action. If we had more takes of the shot, then we could have tried matching it with another shot as well. When looking back at it, we also found that although the lines were said clearly, there was a lot of camera noise present which sounded unprofessional. In hindsight we could improve the sound by recording atmosphere over the camera sound. This might make it more realistic.
6) What have you learnt from completing this task? Looking ahead, how will this learning be significant when completing the rest of you foundation coursework do you think?
This task has been a great learning process as it is the first proper time I have had such experience with personally using such professional equipment as well as working around the limitations.
Firstly I learnt that in order to produce a successful shot sequence thorough pre-production planning is essential, even more important than the production itself. A story board is very useful during the shoot as it helps you visualize the shot before you act/ film it. It is also the most useful when it comes to ordering and editing your shots, post-production, as it helped us order the shots more efficiently and always meant we knew what we were doing. The Shooting script is something I have not used before, but it was very helpful when filming as it meant we did things systematically under the timed conditions. It was also very easy to follow. I think for me, the shooting script and storyboard prove to be a must when it comes to our foundation coursework, something we should work on almost immediately after coming up with our idea.
I also learnt a lot when shooting and how it is essential to look back over your shots until you take the perfect shot. It is always a good idea to take more than one shot as I found with our ‘turning the page’ match on action, as you never things will work out when editing. The more choice you have, the safer you are! I also learnt a lot about the different roles within filming industry and what they do, for example how it is the directors duty to state what is happening clearly ‘Camera rolling/Cut’ etc, as we hadn’t used this full process before. This will be really helpful in our final coursework as it means that we will work in a professional manner with everything in check, and with clear communication between actors and other members. We hadn’t used the sound equipment either which was also very helpful especially for us as we learnt how sensitive it is and how much camera sound it picks up as well. This is good as now we know to consider this when planning our real coursework and finding a way to get passed this.
What I was extremely happy with was finally working out how to use the editing software as I had very little last year. This time we all took turns in editing and I feel much more confident, just in time for the real coursework! I mainly used the cutting and trimming tool. I also used the zoom button to view the timeline in more detail. When editing I saw that the master shot was extremely important when editing as it was repeated and so brought all our shots together.
Finally I leant to keep it simple as this is what makes it work!
28 Days Later
One of the first scenes:
Directed By: Danny Boyle
I chose this clip to analyse as I thought it was a very effective opening to a film. This is because the director builds up the pace of this scene extremely quickly but smoothly, immediately getting the audience’s full attention, and jumping straight into the storyline.
Summary
Late one night Animal activists break into a research centre to free the Chimpanzees from being used in medical research. Although the scientist warns them that the chimps have been infected with a ‘rage virus’, the activists do not believe him and let a chimp free. It immediately attacks both the activists and scientist. This virus then spreads throughout London causing people to turn mindless and kill everything around them.
Analysis
I thought this scene was particularly effective in building up tension through its pacing. The first 24 seconds begin quite slowly as the scientist says ‘I know who you are’ however the pace builds up quickly as the friction between the two characters increases. The director gets this feeling of tension building across through his use of shot-reverse-shot, moving forward and back quite quickly. Another technique I noticed that adds to the growing tension is that along with the increasing pace the shots also go from MS to MCU and finally as the activist shouts ‘Infected with what?’ a CU shot is used. This takes the audience closer and closer in making them feel involved as well as making them want to pull back. However, this type of fear is part of the emotional pleasure you receive from horror films. The low-key lighting also creates a very serious and tense situation. The little lighting allows the audience to just focus on the actors’ facial expression only, which is portraying great concern. The scientist’s hand gestures show us that he is trying to explain something whilst the activist’s face reveals his anger. We can also hear his rage through the increasing volume of his voice. The laboratory setting however is established through the off-screen diegetic sound of chimps creating that 3D world, as well as through the costume (i.e. scientist’s white lab coat). Here, the director purposefully does not establish the scene straightaway to keep the audience in suspense for a while.
The editing is very simple but choppy until it reaches a 3 second pause before the camera cuts to a High angle VLS. This slight pause makes the audience very anxious and edgy as to what is going to follow, only to be shocked by the abrupt cut from CU to VLS. This is another good technique of slowing the pace down and then suddenly jumping to a different extreme shot-type, provoking the intended reactions from your audience.
The mis-en-scene in the next shot all fit the general grim and serious theme as we are able to see the dull and dark laboratory packed with animal cages. The camera then cuts to an MS of the activist trying to push the scientist away, followed by a match on action. Here the pace is building up again. The female activist then motivates the next cut in which the director takes the audience right in to the chimp’s cage with a CU shot. Involving the audience in the action itself is another pace increasing technique as they feel as if they are moving along with the fast movements of the camera. Here it feels as if the chimp is coming towards the audience and the slight low angle makes it look quite powerful and daunting. We then cut to a reverse-shot of the aggressive two men and then again cut to a CU shot of the female activist’s profile. This choppy editing again builds up the tension.
Within the space of the last 4 seconds, the director has used about six shots. One of his techniques is to keep reversing back to the two men, which increases our anticipation as to what is happening on the other side. Throughout their arguing you can here the off-screen diegetic sound of an unlocking cage which would make the audience nervous as they hear the scientists warning ‘It’s contagious’. It then cuts to a Low angle CU of the second scientist opening the cage door. This gives the audience a sense of entrapment as it cuts to the next shot from inside the glass cage itself. The colour scheme of greys and blacks gives it a cold and eerie feel. The feeling of being inside the actual cage also makes you feel slightly claustrophobic and distressed. Here the director places us in the chimp’s point of view. The female activist then opens the cage door and we see a red light flashing at the end of the glass cuboid. Here the red connotes danger, warning and death.
I think that the last few shots are the most effective. An extremely quick pan down into the cage is used from where the chimp seems to run out from nowhere, making the audience jump. The director has also made nice use of the steel frame within the frame although it is quite quick to notice. Following this comes the match on action where we see the chimp from in front. A quick pan and zoom follow which again place us in the chimps position. It seems extremely chaotic and the change in perspectives may also confuse the audience. The characters expression here clearly depicts her panic and alarm. The red flashing light adds to the drama and the pace of the scene. Finally, there is a low angle shot of the chimp leaping out, which after the whole build up seems absolutely terrifying.
If this scene was edited differently for example:
-Establishing the scene
-The two men arguing
-The female activist opening the cage
-The Chimp leaping out
…it would not have the same effect of the building tension, as the quick cuts back and forth, and shots from different angles and perspectives do. I particularly like the way the director has shot form inside the cage so the audience can experience the action. This particular scene is used near the start of the film and I think that jumping straight into the action is an effective way of getting the audience totally engrossed.
Creating a Horror Character
In many horror films, one of the main aspects that are there to frighten the audience and make them jump is the villain’s physical appearance.
Although make-up is usually used to make actors and actresses look more glamorous and beautiful, in horror films actors need make-up and sometimes temporary plastic surgery in order to transform their face into something much more terrifying.
Make-up Techniques
-Use alcohol based make-up colours
-Masks made of latex can be used as well as make-up- these allow you to create scars, wrinkles, warts and wounds.
-Cast and mould the masks
-Theatre blood is useful as it does not dry but remains wet and shiny
-Gel blood is useful if you want the blood to stay put, or stick around a would-it does not dribble
-Frothing blood capsules can be used in the mouth
- Special black tooth wax can be used to create the effect of missing teeth
-Glow make-up cream can be used to create a glowing supernatural green colour by night and a bright white in the day. It is often used on the villain or even skulls and bones to create an eerie effect.
My Interesting Findings!
When researching I found a company well known for its special make-up effects called Drac Studios. They have worked for movies such as Apocalypto, The Mask, The Passion of the Christ as well as the Oscar award winning Dracula. The team is made up of three main members Todd Tucker, Harvey Lowry and Greg Cannom.

They say that today, because High Definition has become so widespread, make-up artists have to pay a lot of attention to the detail so that it looks realistic especially in the CUs. For this reason, their company has developed their own unique silicon make-up appliances which no-one else has. As a result, they won the Technical Achievement Award as their products have dissolvable edges. This means you cannot see where the skin ends and where the make-up starts. How cool is that?
Although make-up is usually used to make actors and actresses look more glamorous and beautiful, in horror films actors need make-up and sometimes temporary plastic surgery in order to transform their face into something much more terrifying.

Make-up Techniques
-Use alcohol based make-up colours
-Masks made of latex can be used as well as make-up- these allow you to create scars, wrinkles, warts and wounds.
-Cast and mould the masks
-Theatre blood is useful as it does not dry but remains wet and shiny
-Gel blood is useful if you want the blood to stay put, or stick around a would-it does not dribble
-Frothing blood capsules can be used in the mouth
- Special black tooth wax can be used to create the effect of missing teeth
-Glow make-up cream can be used to create a glowing supernatural green colour by night and a bright white in the day. It is often used on the villain or even skulls and bones to create an eerie effect.
My Interesting Findings!
When researching I found a company well known for its special make-up effects called Drac Studios. They have worked for movies such as Apocalypto, The Mask, The Passion of the Christ as well as the Oscar award winning Dracula. The team is made up of three main members Todd Tucker, Harvey Lowry and Greg Cannom.

They say that today, because High Definition has become so widespread, make-up artists have to pay a lot of attention to the detail so that it looks realistic especially in the CUs. For this reason, their company has developed their own unique silicon make-up appliances which no-one else has. As a result, they won the Technical Achievement Award as their products have dissolvable edges. This means you cannot see where the skin ends and where the make-up starts. How cool is that?
Sunday, November 2, 2008
Horror Film Director
Alfred Hitchcock (1899-1980)
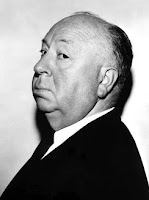
Alfred Hitchcock is known as the ‘master of suspense’ because of his history of successful horror movies and fine film making skills.
He started peaking his career in the 50s and 60s by making films of a more dramatic nature such as Strangers on a Train(1951) and Dial M for Murder(1954). However, he then turned to making more psychiatric mystery type films.
One of his biggest hits was the suspense film, Rear Window in 1954 with Paramount Pictures, which was all shot in one location. This takes much skill and Hitchcock was definitely credited for this groundbreaking film being nominated for Best Director Academy Awards.
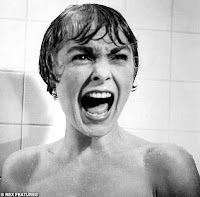
In the genre of horror, two of Hitchcock’s most effective films were Psycho (1960) and The Birds (1963). Hitchcock managed to make the black and white film Psycho one of his most famous movies even with such a low budget. This genre-defining film has become a trademark for horror films and many directors have copied or used ideas from it. The Shower Scene is one of the most famous scenes in cinematic history lasting 3 minutes with more than 50 cuts portraying the violence and gore of this scene extremely effectively.
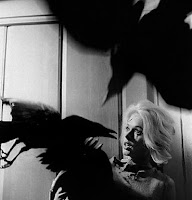
The Birds was also a very effective film about the disturbing attacks of ordinary birds inspiring a whole new era of disaster films to do with nature. It was made with no music score and an unconventional end. This shows the uniqueness of Alfred Hitchcock as a director. He always liked a technological challenge and experiments with different things in his film. For example the film Rope(1948) was shot in 10 takes only.
Hitchcock also invented the ‘Hitchcock zoom’ as it is called today, in his film Vertigo, which is still used by many filmmakers.
Hitchcock’s Secrets:
His films often include:
-struggles within relationships
-beautiful blonde heroines
-he planned his scripts to the smallest of details
-he visualised the shots in his mind
-he learnt his scripts by heart so he would not have to look at them when shooting
-he never changed his films from his initial vision
Therefore, Hitchcock concentrated on pre-production rather than the production itself. From this, I learnt that it is extremely important to plan things out in detail and know exactly what you are doing in order to make a successful production.

Alfred Hitchcock is known as the ‘master of suspense’ because of his history of successful horror movies and fine film making skills.
He started peaking his career in the 50s and 60s by making films of a more dramatic nature such as Strangers on a Train(1951) and Dial M for Murder(1954). However, he then turned to making more psychiatric mystery type films.
One of his biggest hits was the suspense film, Rear Window in 1954 with Paramount Pictures, which was all shot in one location. This takes much skill and Hitchcock was definitely credited for this groundbreaking film being nominated for Best Director Academy Awards.
In the genre of horror, two of Hitchcock’s most effective films were Psycho (1960) and The Birds (1963). Hitchcock managed to make the black and white film Psycho one of his most famous movies even with such a low budget. This genre-defining film has become a trademark for horror films and many directors have copied or used ideas from it. The Shower Scene is one of the most famous scenes in cinematic history lasting 3 minutes with more than 50 cuts portraying the violence and gore of this scene extremely effectively.

The Birds was also a very effective film about the disturbing attacks of ordinary birds inspiring a whole new era of disaster films to do with nature. It was made with no music score and an unconventional end. This shows the uniqueness of Alfred Hitchcock as a director. He always liked a technological challenge and experiments with different things in his film. For example the film Rope(1948) was shot in 10 takes only.
Hitchcock also invented the ‘Hitchcock zoom’ as it is called today, in his film Vertigo, which is still used by many filmmakers.
Hitchcock’s Secrets:

His films often include:
-struggles within relationships
-beautiful blonde heroines
-he planned his scripts to the smallest of details
-he visualised the shots in his mind
-he learnt his scripts by heart so he would not have to look at them when shooting
-he never changed his films from his initial vision
Therefore, Hitchcock concentrated on pre-production rather than the production itself. From this, I learnt that it is extremely important to plan things out in detail and know exactly what you are doing in order to make a successful production.
Horror Genre Conventions
Themes
-death
-secrecy
-fear
-gore
-isolation
-trapped
-revenge
-spying/stalking
-jealousy
-anger
-obsession
-lust/passion
-love
-psychiatric behaviour
-illusions
-torture
-chases
Characters
-victim
-female
-teenager
-killer
-vampires
-zombies
-villains
-boyfriend
-hero
-detective
-police
-ghosts
MIS-EN-SCENE
Style
-dark
-low key lighting
-unnatural light
-shadows
-distorted
-low angles
-shaky/handheld camera
-POV shots
-CUs/ECUs
-fast cuts
-slow paced tracking
-stormy
-Night-time
-silhouettes
Settings
-haunted house
-abandoned buildings
-bedrooms
-hospitals
-dark alleys
-ancient buildings
-basements
-bathrooms
-forests
-isolated places (hotels)
-near lakes/open water
-the ordinary (school/home)
Props
-blood
-knives
-guns
-masks
-candles
-mirrors
-carved pumpkins
-torches
-fangs
-cloaks
-wigs
Sounds
-creaks
-screams
-stabs
-gunshots
-heartbeats
-weather (rain, storms, thunder, lightening, wind)
-police sirens
-breaking things (glass)
-silence
-footsteps
-death
-secrecy
-fear

-gore
-isolation
-trapped
-revenge
-spying/stalking
-jealousy
-anger
-obsession
-lust/passion
-love
-psychiatric behaviour
-illusions
-torture
-chases
Characters
-victim
-female

-teenager
-killer
-vampires
-zombies
-villains
-boyfriend
-hero
-detective
-police
-ghosts
MIS-EN-SCENE
Style
-dark
-low key lighting

-unnatural light
-shadows
-distorted
-low angles
-shaky/handheld camera
-POV shots
-CUs/ECUs
-fast cuts
-slow paced tracking
-stormy
-Night-time
-silhouettes
Settings
-haunted house
-abandoned buildings

-bedrooms
-hospitals
-dark alleys
-ancient buildings
-basements
-bathrooms
-forests
-isolated places (hotels)
-near lakes/open water
-the ordinary (school/home)
Props

-blood
-knives
-guns
-masks
-candles
-mirrors
-carved pumpkins
-torches
-fangs
-cloaks
-wigs
Sounds
-creaks
-screams

-stabs
-gunshots
-heartbeats
-weather (rain, storms, thunder, lightening, wind)
-police sirens
-breaking things (glass)
-silence
-footsteps
Sound
Sound is one of the most important parts of films can make or break the experience the cinematic experience, however this has not always been the case in the filming industry. The first film featuring a soundtrack was The Jazz Singer (1927) followed by Lights of New York (1928).
Today the use of sound has developed much more and as along with the dialogue, there is also extensive use of music and sound effects. It places you in the situation so that you can hear every creak in a haunted house, every whistle of the wind and even the quietest footsteps.
Diegetic Sound
Diegetic Sound is sound that you would hear if you were placed in the scene, but you may not necessarily be able to see it onscreen. It gives us the feeling that thee is a world beyond what we see through the camera. For example, if a character were sitting on their bed reading a book, whilst another character is in the room next door listening to music the Onscreen Diegetic sound would be the turning of pages, however the Off-screen Diegetic sound would be the radio somewhere in the background. This helps create a three dimensional world of a house in the eyes of the viewer even if the scene is shot on a small set.
In Horror films off-screen diegetic sound is often used to give us clues or warn us of danger. For example if the character was sitting on their bed reading when home alone, and we hear the creaking of an opening door followed by footsteps, we can assume that the character is in danger of someone spying on or stalking them.
Non-Diegetic Sound
Non-diegetic sound is sound that you would not be able to here if you were placed in the scene, for example the voiceover or dramatic music. It is the sound that is only heard by the audience but not the characters.
Sound Bridges
This is when sound links scenes together through bridging making them seem more coherent. The sound from one scene may lead on to the next seen even if the image has changed. Alternatively, the sound from the next scene may be heard before we see the image. This is another way of maintaining film continuity.
Parallel Sound
This is when the sound complements the atmosphere or mood of the film. For example if everything is happy then there would be upbeat and higher pitched music, but when it is sad the music may be slow and thickly layered.
Contrapuntal Sound
This is when the sound contradicts the mood, so it may be a really sad moment in the film, but the music may be quite upbeat and happy sounding. This can also be known as ‘asynchronous’ sound.
Foley Artists
FOLEY
Foley is sound effects made to enhance the diegetic sounds through the use of everyday objects, for example in Jurassic Park the sound of the cracking egg of the new born dinosaur is made by cracking an ice cream cone. It improves the quality of the sound making it sharper and making things seem more realistic. Here is a video on Foley Artists that I found quite interesting and informative.
Points from the Video:
- Microphones do not pick up all sounds so Foley Artists are there to recreate these sounds
- Jack Foley invented this idea
- It is useful in both films and video games
Key To Good Foley:
When the job is done well, you don’t know its been done!
Saturday, November 1, 2008
Recent Horror Market
 Mirrors is the most recent horror film released (15th August 2008) about an evil force that exists within the mirrors of a burned out department store, which had been built on the site of an old psychiatric hospital.
I decided to look at the still shot on the Mirrors poster, which to me clearly seems to portray the genre of horror. This is obvious from the minimal use of colour and low-key lighting and the actor’s facial expression.
The director has used a CU shot of his actor looking completely pale and terrified with her eyes wide and mouth gaping open as if she is screaming. The top of her head is intentionally not in frame so that the audience can focus on the distressing eyes that directly address them. It is also interesting the way the director links the image to another of is horror productions The Hills Have Eyes, making the poster work as a whole.
The image also appears central on the poster so to immediately attract the audience’s attention. It seems to be a Low Angle shot making the character gaze down at the audience threateningly. The image is not very sharp and therefore seems to be a reflection tying in with the theme of mirrors. We can also see a crack in the left eye where the image is slightly blurred. This could connote illusions or hallucinations as well as bad luck for the believers of superstition. The crack could also connote some sort of violence.
Over lighting has been used from an artificial source of light creating a torch effect. The over lighting also makes the character’s face seem slightly distorted to make her look like a psycho. The low-key lighting adds to the mystery and suspense of the movie as the audience is unable to see the setting or even the actor’s full expression and body language. Darkness usually connotes the unknown dangers and this effect is emphasised by the colour scheme of black white and red. The colour black creates enigma often connoting the evil dark side or even death and mourning. The white gives the poster a ghostly feels and stands out clearly. The red colour is used to make the title Mirrors distinct from all the other text present. It also connotes danger and we often associate it with blood and therefore violence and death.


Therefore, I think this poster is quite effective in portraying the genre of horror. We can also see its genre conventions by comparing it with other horror film posters like Friday the 13th.
I found that these two posters were quite similar in their use of colour and image. Both posters are dominated by the colour black and involved one central image of a face/mask. Both also use low-key artificial lighting. This underlines the idea that genre films work on the basis of a repetition of elements to help target a film at a particular audience, however they also have some difference. This is evident in my example, as one image is a reflection in a mirror whilst the other is a mask.
 Although this film is directed by Alexandre Aja, it is interesting to see how ‘Mirrors’ is a concept used in many films in the horror genre by well known directors like Alfred Hitchcock.
An interesting example can be seen in the film Psycho where we see mirror reflections of Marion Crane whilst she checks into the Motel under the different name and Norman Bates who has a split personality. Here the mirrors reflect both characters double roles.
This is just a brief insight into how genre films work using repetition and difference.
So how will the use of mirrors differ in this new release?
Tzvetan Todorov’s Theory

As it was Halloween last night, I thought it would be a good idea to do some media research so I decided to watch Halloween 2 which comes in the slasher-film subgenre. Whilst watching it I noticed the application of Tzvetan Todorov’s Narrative Theory. Todorov said that stories usually begin with an equilibrium, which is disrupted by some event leading to a series of events. The problem is eventually solved and the story returns to a new equilibrium.
The Different Stages of his Theory
1) Equilibrium (an ordered state)
As Halloween 2 is a sequel, it goes straight into the disruption stage. However, it does mention that the fictional character of Micheal Myres had been kept in a mental hospital for the last 15 years after killing his older sister on the night of Halloween. Since then everything had been fine.
2) Disruption
Micheal Myres manages to escape the mental institution and is in search of Laurie Strode. He murders many teenage babysitters and Laurie’s friends during his search.
3) Recognition
The Police are informed that Micheal Myres is on the loose but concentrate on investigating the local elementary school where it says ‘Samhain’ (lord of the dead) in blood on the chalkboard. Meanwhile Micheal Myres has in fact found the hospital where Laurie Strode has been taken; whom they find out is actually Micheal Myres’s adopted sister. He murders the hospital staff one by one.
4) Attempt to repair damage
Dr Loomis, Michael’s psychiatrist, his assistant Marion Chambers and The Marshall all drive to the hospital to get Myres before he finds Laurie. They shoot him several times but he survives and kills The Marshall. Laurie shoots him in the eyes so he is now blind but still able to wave his knife around. Finally, Dr Loomis blows up the operating room with his cigarette lighter causing an explosion in which both of them die.
5) Return to a New Equilibrium
Laurie is transferred to another hospital. The town of Haddonfield is safe again, as Micheal Myres is no longer on the loose, but he has murdered 10 people by the end.
Halloween Opening Credits
When looking at different opening credits for different horror films, I found that they are all generally very simple revealing little about the film narrative itself. They seem to linger on so that the audience is forced to watch the just the text, keeping them in a lot of suspense for quite some time.
The Halloween (1978) opening credits are a good example of this as they show this technique of keeping the audience in suspense and in the unknown for a few minutes. However, the title itself acts as a genre signifier for the audience, as audiences would usually recognize the subject of Halloween as being that of horror with its connotations of ghosts and witches.
The first 5 seconds of the opening credits is just a black screen and the audience have no idea what to expect. The piano music along with the synthesized clicking sound however really builds up the tension as the titles start to come on screen. After ‘Moustapha Akkad presents…’ appears on the screen, the director does not immediately reveal the title, but an iconic image of a pumpkin/jack-o-lantern, which is contiguous to the idea of Halloween. This would be very effective in cinema, as the black screen would mean the audience is surrounded by the mysterious darkness with the only light coming from the lantern inside the pumpkin. It appears with a sudden volume increase in the piano, adding a new melody that makes you feel quite uneasy.
He then introduces the main actor, Donald Pleasence, who as part of the narrative image is identifiable to the audience therefore making them more and more anxious to see the movie. His name is emphasized by the largeness of the font, so that it immediately catches the audiences’ attention. The director’s name then appears in smaller font followed by the large title ‘Halloween’ at exactly 30 seconds. The director has therefore used the first 30 seconds of the opening titles to build up tension. However, by giving the audience information that they are most likely to have already known, the director is at the same time attracting and involving them as this familiarity brings the audience a form of pleasure and contentment.
After mentioning the producers, the director then goes back to introducing the actors but those, which are new or those with a less important part. He mentions both the actors name and their character name so that audiences and identify who’s who and familiarise themselves with them, hoping that they too gain more popularity from starring in this film.
The director then goes on to mention the other roles in the industry such as those involved in screenplay, photography, music etc. Interestingly, although there is no action involved the iconic pumpkin seems to be getting larger and larger. The effect of this on the audience would be quite threatening, as it feels as though you are moving closer and closer to it, as if being pulled in towards the screen. It also builds up audience apprehension as you see the transformation from a small Halloween pumpkin to something that looks rather monstrous and menacing. Although this clip does not show it, the pumpkin eventually splits into a skull, which may get the audience even more worried. Skeletons of course connote the idea of death and decay. The thought of there no longer being any flesh or eyeballs can be quite troubling.
As it gets bigger and bigger the music also changes at 53 seconds where the strings come in, slowly increasing in pitch as if leading up to something big. However, the strings fade away again as if to not give away too much, and the music returns to its original uneasy melody. The strings and piano return repeating the same three notes ending on a loud high-pitched sound. This effectively creates the right tense atmosphere for the viewer and gets them into the mood before the film starts. The strings also build up the excitement as audiences gain pleasure from being thrilled. The music used during the opening titles is repeated throughout the film every time the murderer appears on screen.
The slow fading on and off titles really keeps the audience waiting and anticipating what is going to happen, making them slightly edgy and nervous. The Pumpkin and lantern also matches the font colour that fades from red to orange to yellow, giving the film a sort of brand image under the colour black and orange. The colour red also connotes danger as well as blood therefore representing the gore of a horror film. Red orange and yellow are also colours of a flame and also connotes danger or signifies some sort of warning to the audience.
Roland Bathes Theory
Don’t Look Now (1973)
After watching a few horror films, it seems that there are two ways of creating an effective horror film, both of which a successful but in different ways. The first approach is by actually showing the physical violence and gore, or a film full of shocking effects and constant action for example Aliens. This can evoke emotional and visceral pleasures within the audience.
On the other hand, there are the horror films that use intellectual puzzles to create pleasure and therefore focus on the more mental elements of the story. Here, I found that Roland Bathes’s theory of the Enigma Code often applies to these types of horror films in which mysteries are set up to be developed and resolved. The Enigma Code usually raises many questions due to unexplained elements in the narrative, which are answered in the final revelation. However throughout the story, clues are offered to the reader in terms of ‘snares’ (evasions of the truth), as well as ‘equivocations’ (mixtures of truth and snare).
This theory is extremely evident in Don’t Look Now and I have picked a particular scene, which I think exists as enigma for the viewer for much of the movie. To summarise, it is the scene in which John Baxter leaves to return to his wife and son in London, however as he sets sail, he sees his wife with the two sisters Heather and Wendy dressed in black on a funeral boat in Venice. This is in fact and equivocation, as although this does happen, it is not happening at that particular time, and therefore it is a mixture of truth and snare. It is foreshadowing John Baxter’s death in the near future, however the audience is not aware of this due to the vagueness of the clue and therefore are left puzzled. The audience is left with questions like ‘Why is Laura in Venice?’, ‘Why hasn’t she told John?’, and ‘Who’s funeral is she attending?’
As Roland Bathes says ‘Partial answers’ are given along the way, for example shortly after John speaks to Laura on the phone, he finds that she is not in Venice but in London where she was meant to be and with their son. This goes on to raising more questions like ‘Was it all just part of John Baxter’s imagination?’ All these ‘loose ends’ and questions are answered in the final revelation where we come to see that John’s visions are premonitions of the future as he sees his own death and his daughter’s. We are also given clues about his death when the blind woman, Heather, warns Laura that her husband is in danger in Venice and that they should leave immediately.
Another example of the Enigma code in this film is the mysterious figure in the red coat that resembles Christine, the Baxters’s daughter. John sees many glimpses of this mystery figure although it keeps vanishing. We are however, given clues about its identity when for example the police lift a body out of the water. The figure seems to be the ghost of Christine, but as we see in the final revelation, it is in fact a serial killer.
After watching a few horror films, it seems that there are two ways of creating an effective horror film, both of which a successful but in different ways. The first approach is by actually showing the physical violence and gore, or a film full of shocking effects and constant action for example Aliens. This can evoke emotional and visceral pleasures within the audience.
On the other hand, there are the horror films that use intellectual puzzles to create pleasure and therefore focus on the more mental elements of the story. Here, I found that Roland Bathes’s theory of the Enigma Code often applies to these types of horror films in which mysteries are set up to be developed and resolved. The Enigma Code usually raises many questions due to
 unexplained elements in the narrative, which are answered in the final revelation. However throughout the story, clues are offered to the reader in terms of ‘snares’ (evasions of the truth), as well as ‘equivocations’ (mixtures of truth and snare).
This theory is extremely evident in Don’t Look Now and I have picked a particular scene, which I think exists as enigma for the viewer for much of the movie. To summarise, it is the scene in which John Baxter leaves to return to his wife and son in London, however as he sets sail, he sees his wife with the two sisters Heather and Wendy dressed in black on a funeral boat in Venice. This is in fact and equivocation, as although this does happen, it is not happening at that particular time, and therefore it is a mixture of truth and snare. It is foreshadowing John Baxter’s death in the near future, however the audience is not aware of this due to the vagueness of the clue and therefore are left puzzled. The audience is left with questions like ‘Why is Laura in Venice?’, ‘Why hasn’t she told John?’, and ‘Who’s funeral is she attending?’
As Roland Bathes says ‘Partial answers’ are given along the way, for example shortly after John speaks to Laura on the phone, he finds that she is not in Venice but in London where she was meant to be and with their son. This goes on to raising more questions like ‘Was it all just part of John Baxter’s imagination?’ All these ‘loose ends’ and questions are answered in the final revelation where we come to see that John’s visions are premonitions of the future as he sees his own death and his daughter’s. We are also given clues about his death when the blind woman, Heather, warns Laura that her husband is in danger in Venice and that they should leave immediately.
Another example of the Enigma code in this film is the mysterious figure in the red coat that resembles Christine, the Baxters’s daughter. John sees many glimpses of this mystery figure although it keeps vanishing. We are however, given clues about its identity when for example the police lift a body out of the water. The figure seems to be the ghost of Christine, but as we see in the final revelation, it is in fact a serial killer.
Writing a Horror Film
From researching, I found that the four elements that are essential in any horror film are ‘isolation, desolation, lost cause and redemption’. I decided to look further into these four elements.
Isolation
The hero of your story should be separated mentally or physically from everyone else. Physically they may be living alone or have moved to somewhere remote and deserted. This means that they can get no outside help creating the perfect situation for horror. Examples of this can be seen in Psycho where the main character Marion Crane goes to stay at the isolated Bates motel where no other guests are present. Another example is Jim in 28 Days Later who wakes up from his coma in a deserted hospital to find London also completely deserted. It is usually a situation which they cannot escape for example the hotel in The Shinning.
Desolation
The hero must have a flaw. In desperation, they may run into a worse situation whilst trying to find a safer place. For example in Psycho, we see that stressed and fatigued from the heavy rain, Marion decides to take a break at the Motel, which is a bad decision to make.
Lost Cause
This is when the evil begins to become successful in attacking the victim, and is usually the point when people start dying in horror films. We can see this in A Nightmare on Elm Street where the ghost of a serial child murderer, Freddy Krueger, murders both characters Tina and Rod. The hero is usually reduced at this point in the story.
Redemption
This is when the hero is redeemed for their mistake and has to pay back. They may die at the end. We can see this in Don’t Look Now when even though John Baxter had been warned by the psychic woman that he was in danger and must leave Venice, he did not listen and this was his fatal flaw. In the end he gets murdered by the serial killer in Venice. This however is not necessary as we see in some cases, the hero may face his fear and overcome it after investigating the truth behind the horror.
Subscribe to:
Posts (Atom)
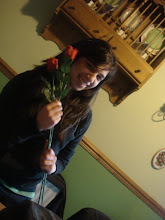